Schedule Examinations
With the Schedule Examinations tool, a user can assign metadata to or cancel it from existing exams, which are already in the system. New Examinations cannot be created with this form.
The form control has 3 Tabs, labelled 'List', 'Bulk Update' and 'Bulk Cancel' and these are used as follows:
List
 The grid has 18 columns, all of which can be filtered on.
You can filter results by entering or selecting values of a Process ID, Asset (enter an Asset GUID into the Carrs GUID textbox or enter values into the ELR and Mileage textboxes), examination, report type, and report-related dates into the filter controls. All these items should enable you to quickly locate the exam(s) you want adjust the schedule for. Results are filtered as soon as the filter values are entered or selected.
The grid has 18 columns, all of which can be filtered on.
You can filter results by entering or selecting values of a Process ID, Asset (enter an Asset GUID into the Carrs GUID textbox or enter values into the ELR and Mileage textboxes), examination, report type, and report-related dates into the filter controls. All these items should enable you to quickly locate the exam(s) you want adjust the schedule for. Results are filtered as soon as the filter values are entered or selected.
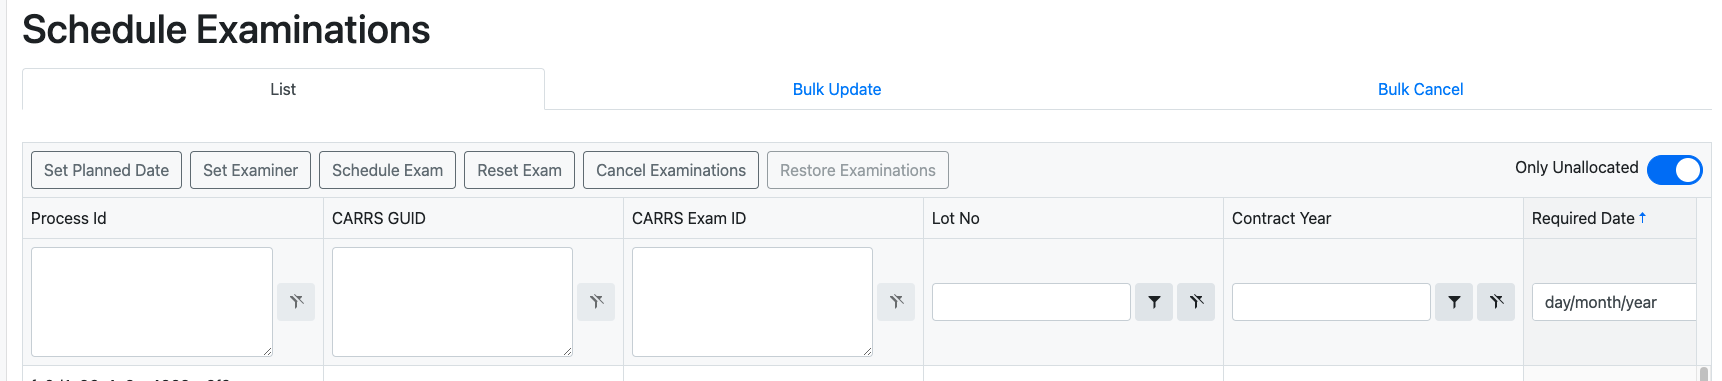
To the right of the 6 buttons at the top of the panel, there is also an 'Only Unallocated' slider. When this is selected, returned results will be filtered to only show exams which have not been previously allocated to an Examiner. This is the default mode but if you want to see exams which are already allocated, you must slide that to the left ('off') position (see image):

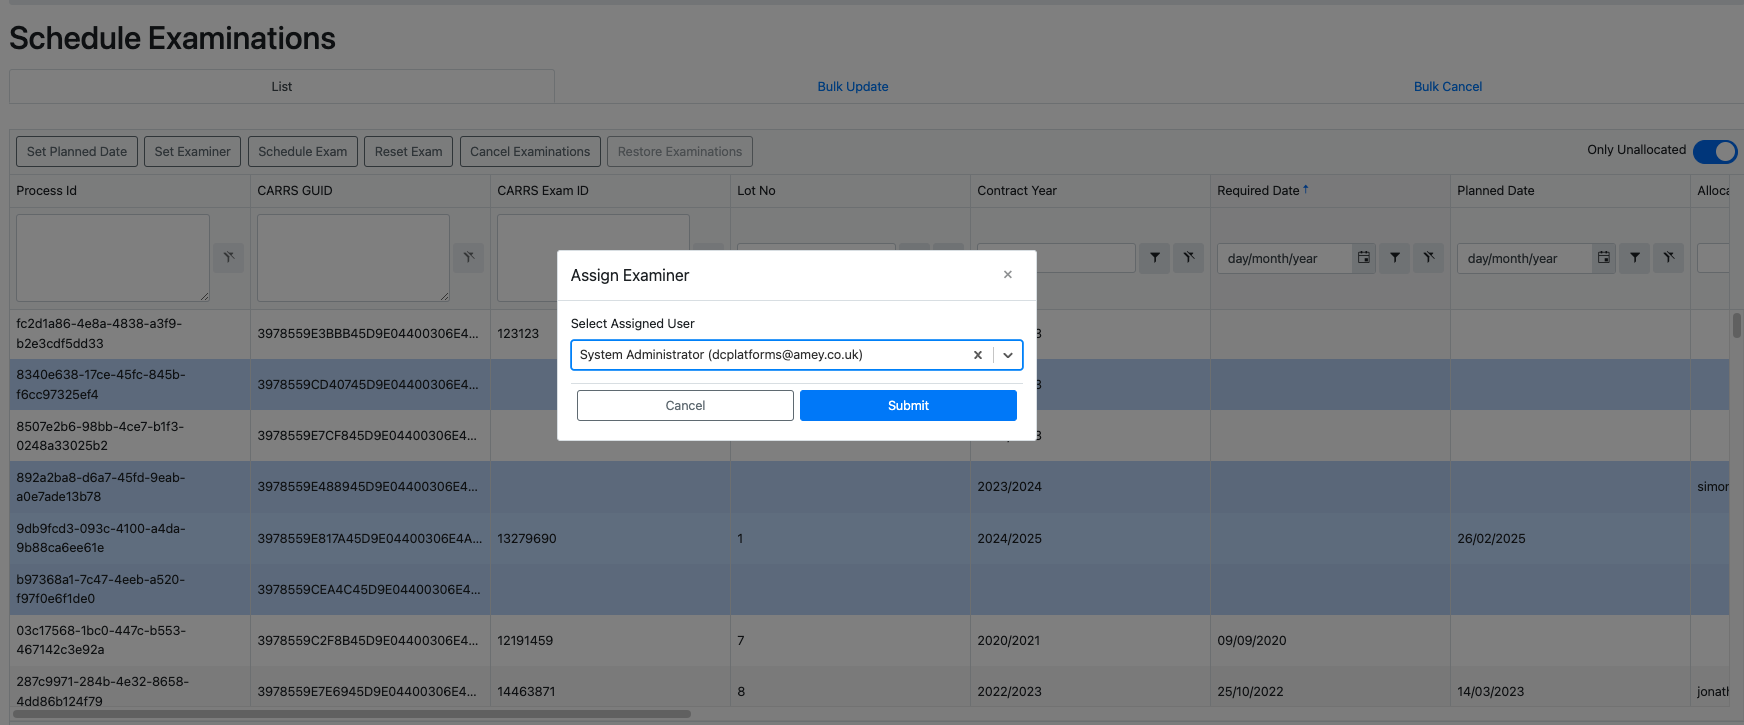
Once you have filtered sufficiently, the exam(s) you are looking for should appear in the grid below. To select a single exam, left-click its row; to select multiple rows, hold down 'Ctrl' and left-click each row you want to include. To select a continuous range, left-click at the top of the selection, navigate down to the final item and while holding down 'Shift', left-click again. The exams you have selected will be highlighted blue. You are now ready to perform scheduling on the exam(s).
You can use one of the six buttons directly underneath the Tabs to change the schedule for exam(s). The options available are 'Set Planned Date', 'Set Examiner', 'Schedule Exam', 'Reset Exam', 'Cancel Examinations' and 'Restore Examinations'. In the following image, we have selected a group of exams, as above and we are preparing to assign an examiner to them all. We click the 'Set Examiner' button and then a dialogue box will appear and we can select the Examiner we want to assign from the drop-down. When we click 'Submit', the selected Examiner wil be assigned to all our selected exam(s):
To cancel an exam, select a group of exams and click the 'Cancel Examinations' button. Canceled exams can be restored by clicking the 'Restore Examinations' button. However, an exam can only be restored if its 'CARRS Exam ID' is not assigned to any other exam. If the 'CARRS Exam ID' is already assigned to another exam, it must be removed from that exam before proceeding with the restoration.
Bulk Update
To use the Bulk Update feature, select the 'Bulk Update' Tab (arrow 1):
 The Bulk Update tool requires data in a certain format and if you don't already have a template spreadsheet, you can download one here by clicking the 'Download Template' button (arrow 2). This file will then normally be found in your 'Downloads' folder, from where you can open it and fill it in.
The Bulk Update template spreadsheet has many editable columns, any of which can be supplied along with the compulsory field Process Id. The Process Id is unique to every scheduled Examination, so this is the key that the user must supply.
You can fill as many spreadsheet rows as you want to, each row corresponding to one specific exam by it's unique Process Id.
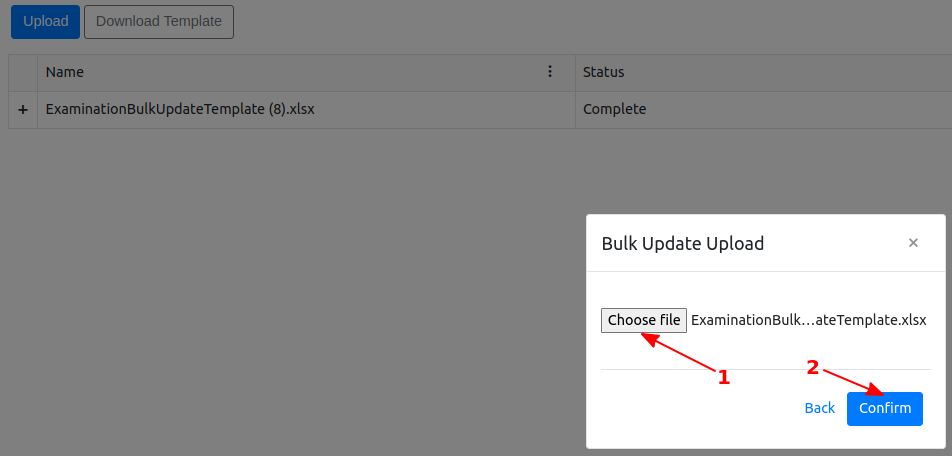
Once you have filled in your spreadsheet as required, you should then click the 'Upload' button (arrow 3).
The Bulk Update tool requires data in a certain format and if you don't already have a template spreadsheet, you can download one here by clicking the 'Download Template' button (arrow 2). This file will then normally be found in your 'Downloads' folder, from where you can open it and fill it in.
The Bulk Update template spreadsheet has many editable columns, any of which can be supplied along with the compulsory field Process Id. The Process Id is unique to every scheduled Examination, so this is the key that the user must supply.
You can fill as many spreadsheet rows as you want to, each row corresponding to one specific exam by it's unique Process Id.
Once you have filled in your spreadsheet as required, you should then click the 'Upload' button (arrow 3).
A dialogue pop-up will appear (see screenshot) from which you click the 'Choose file' button (arrow 1). Navigate to your spreadsheet, wherever you have kept it. select it - the name of your file will be displayed to the right of the button. Click the 'Confirm' button on the dialogue (arrow 2):
Once you have confirmed, the system will process the data you supplied in the spreadsheet. The results of processing will be displayed in the grid below, along with any previous Bulk Updates.
Note
You can upload multiple spreadsheets with the same name and in this case an indexing number will appear in brackets to the right of the spreadsheet name. This can be useful if you want to process the same schedule with minor changes to the data
As the sheet is being processed, the Status column of the grid below will say 'Processing'. Once completed, it will say 'Completed'.
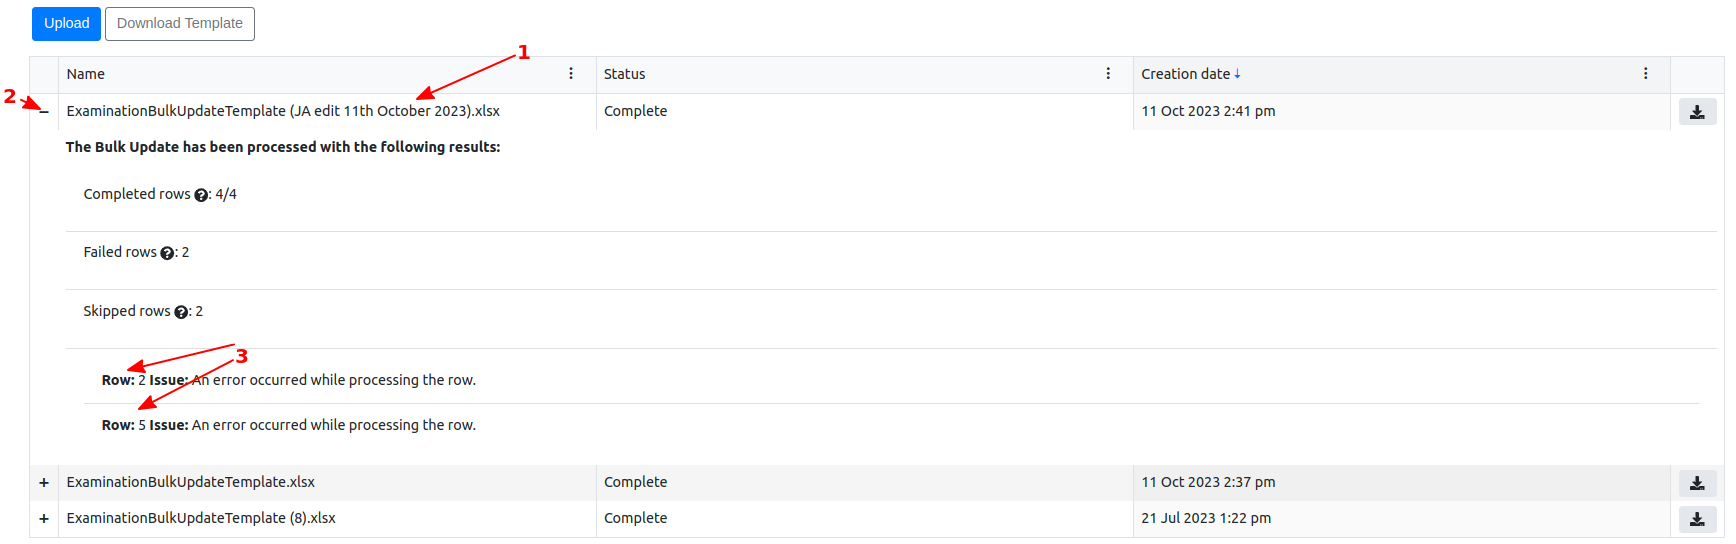 To view the results, click the '+' symbol next to your spreadsheet name (arrows 1 and 2), which will then turn to a '-' symbol.
The table displayed will give details of how the processing went. Any problem (error) rows will show a more detailed message and reason for failure (arrows 3).
If there are rows skipped, this means that whilst that row could be processed, no data in the database was actually changed (for instance if you supplied just a Process Id or if you also supplied a value for one of the other fields, which was the same as it's value stored in the database). What skipped rows means is that you don't have to worry about it if you supplied the same data again. You might also have a spreadsheet copy from previous processing, for which most of the data remains the same, but a few values have changed. You can upload and process this again. It will take a little time, so the general rule for efficiency is to supply just rows which you know have changed values.
Lastly, at the right hand side of the grid rows (arrow 4), you will see a download symbol (a black line with an arrow coming down to it). Each processed spreadsheet will have this and you can click that to download one of these previously processed sheets. This could be useful if you need to change data from previous processing but you didn't save a copy of the sheet you uploaded.
To view the results, click the '+' symbol next to your spreadsheet name (arrows 1 and 2), which will then turn to a '-' symbol.
The table displayed will give details of how the processing went. Any problem (error) rows will show a more detailed message and reason for failure (arrows 3).
If there are rows skipped, this means that whilst that row could be processed, no data in the database was actually changed (for instance if you supplied just a Process Id or if you also supplied a value for one of the other fields, which was the same as it's value stored in the database). What skipped rows means is that you don't have to worry about it if you supplied the same data again. You might also have a spreadsheet copy from previous processing, for which most of the data remains the same, but a few values have changed. You can upload and process this again. It will take a little time, so the general rule for efficiency is to supply just rows which you know have changed values.
Lastly, at the right hand side of the grid rows (arrow 4), you will see a download symbol (a black line with an arrow coming down to it). Each processed spreadsheet will have this and you can click that to download one of these previously processed sheets. This could be useful if you need to change data from previous processing but you didn't save a copy of the sheet you uploaded.
Bulk Cancel
To use the Bulk Cancel feature, select the 'Bulk Cancel' Tab (arrow 1):
 The Bulk Cancel tool requires data in a certain format and if you don't already have a template spreadsheet, you can download one here by clicking the 'Download Template' button (arrow 2). This file will then normally be found in your 'Downloads' folder, from where you can open it, fill it in and Upload it again (arrow 3), once you have filled it in.
The Bulk Cancel template spreadsheet has 3 columns. Each row you provide needs to have a valid value in the 'Process Id'. The Process ID is unique for every exam, so that is required to cancel an exam. However, NR may have ordered the Cancellation of an Exam via a Change Request, so if this is the case, the user should enter the Change Request (CR) Number from the Change Request order sheet supplied by NR. The final column is for the Nr Job ID. If this is known, the value should also be entered, where applicable. So once you have filled the sheet in, click the 'Upload' button (arrow 3). A dialogue will appear (see screenshot below).
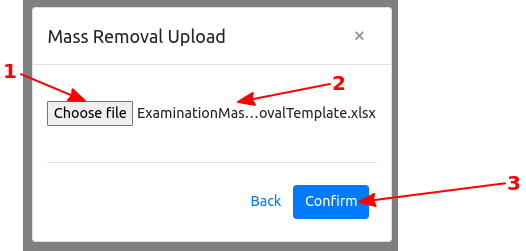
In this dialogue, click the 'Choose file' button (arrow 1). Select the Mass Cancel file from your file system. The name will be displayed to the right of that button (arrow 2). Then click the 'Confirm' button (arrow 3) and your spreadsheet will be processed.
Processing results will be displayed in the grid below (See screenshot)
 You will see the names of any spreadsheets you have processed or that are being processed (arrow 1). The status of the processing is displayed in the next column (arrow 3) and the completed date (arrow 4).
You can click the '+' symbol (arrow 2) on the left of the row to open a detailed results grid showing processing results (See screenshot):
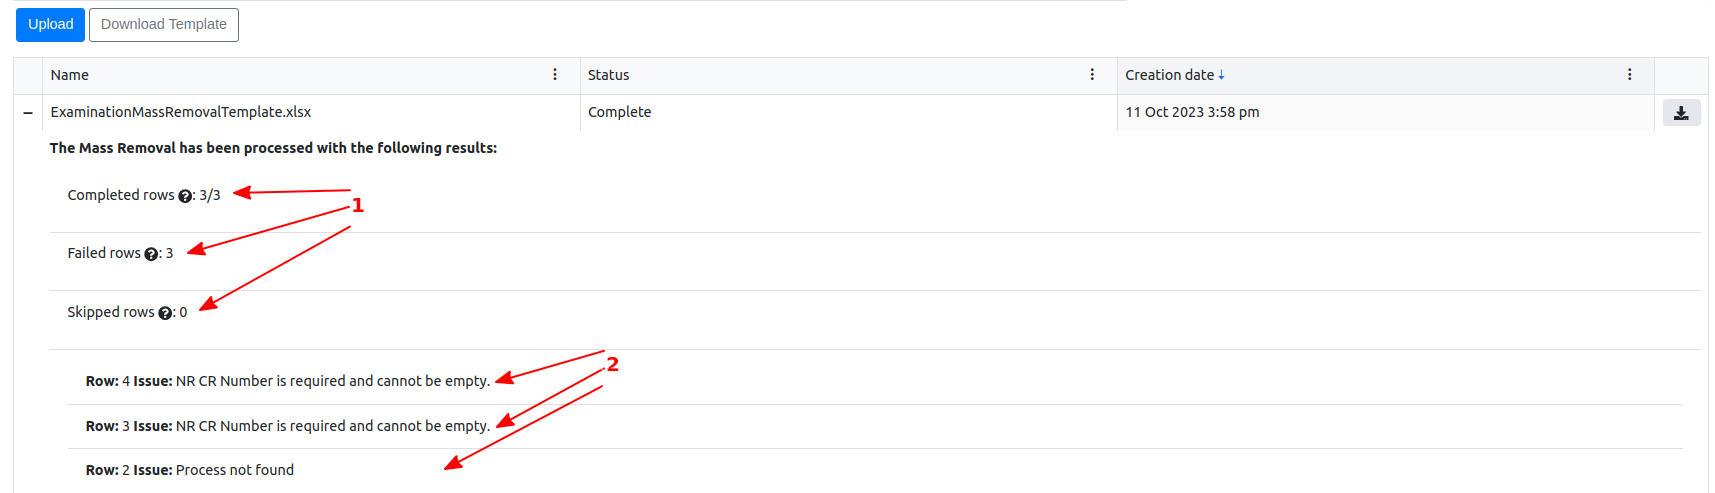 The grid shows counts of Completed, Failed and Skipped rows (arrow group 1). The grid then shows a comment for each Failed row (arrow group 2), giving the error. You can see from the errors in the screenshot that 2 of the rows in the example upload didn't have an NR CR Number, which is compulsory. The other error shows that we supplied a Process Id which doesn't exist in the database, meaning that no exam exists with the supplied Process Id.
When examinations have been
The grid shows counts of Completed, Failed and Skipped rows (arrow group 1). The grid then shows a comment for each Failed row (arrow group 2), giving the error. You can see from the errors in the screenshot that 2 of the rows in the example upload didn't have an NR CR Number, which is compulsory. The other error shows that we supplied a Process Id which doesn't exist in the database, meaning that no exam exists with the supplied Process Id.
When examinations have been